Hero Setup
The following is an overview of the HeroSetup prefab in the AdventureHero demo.
HeroSetup
The top gameobject starts off with a couple components related to Persistence.
PersistenceContainer is the main persistence component that manages all the current data.
The PlayerPrefSaver is used by the container to load and save its data to unity player prefs. When the Debug field on the saver is checked it uses temporary variables instead. The data in DebugData then deactivates intros and starts the inventory off with a sword and shield.
The PlaytimePersister saves the current playtime which is then displayed in the intro scene when selecting the save game. The RandomStatePersister makes sure that random drops like items from pots are consistent between sessions.
The StateManager manages the general state of gameplay. The PLAY and MENU states are triggered by input events on the PlayerInput component on HeroCharacter. The CUTSCENE state is, for example, triggered by a state override in the HeroIntroBeach timeline. Check out the events of the manager to see all the actions it performs when states are changed. Some examples are:
- Switching Input Action Map
- Showing and Hiding Menu UI
- Transitioning the Audio Snapshot
- Setting the HUD State
HeroSetup also contains the scenes variables for Visual Scripting. Action contains the context action that the HeroCharacter state machine determines. ActionOverride is used by some actions like holding a bomb to temporarily override that action.
Camera
This object contains the main Camera and CinemachineBrain as well as a couple different virtual cameras.
The Flash and Hurt cameras have a timeline that very shortly switches to them resulting in Red and White flashes of the screen. They are triggered by FLASH and HURT messages on the character. HURT is sent from the HeroCharacter state machine when damage occurs. FLASH is sent on start by a script machine in the HeroNutImpact.
The free look and first person objects are used by the LockableCameraFreeLook on the camera object inside the HeroCharacter for the general camera movement.
The PresentCamera is switched to within the HeroPresent timeline when new items are shown. It points at the PresentTarget within the character model in front and above the character.
HeroCharacter
The HeroPlayerCharacter script contains some custom hero demo logic in addition to the base character functionality it inherits from the core character class. This includes presenting new items and sheathing the items the character has in its hands. It also forwards confirmation and cancel presses to text boxes. If you check its events in the inspector you should find some actions that forward messages to the audio manager.
Most of the custom logic of the character is defined in the HeroCharacter state machine.
- Forwarding Animation Parameters from Movement
- Triggering Idle Animations
- Choosing and Triggering Context and Attack Actions
- Responding to Damage and Death
When the main StateManager is not in its PLAY state the character state machine moves from its Gameplay to its Paused state and also sets the Time Scale of the entire game to 0.
The CharacterController and CharacterControllerMovement manage the characters movement. The movement speed is set to 0 because in this demo movement is driven by the root motion of the animations.
PlayerInput is a part of the ‘New Input System’ in Unity. It is configured to Invoke Unity Events here so you can find the various actions that are driven by Input by expanding the Events field.
The SignalReceiver at the bottom can receive the HeroReset signal from timelines to reset the camera controller. This is done in the HeroPassage timeline to reset the camera position to the new position at the other side of the door.
HeroKid
This is where the visuals of the player are located. It contains the Animator along with an AnimatorProxy that passes along events and root motion from the animator to the character.
The following steps show how the player model could be replaced by the skeleton model that is usually used by the enemies. Some other components of the demo depend on the player model so those have to be moved over or reassigned.
- Open up the HeroSetup prefab
- Drag the Models/Characters/HeroSkeletonZombie into HeroCharacter
- Assign the HeroKid Controller to the Controller of the Animator
- Select the old HeroKid object and drag over the AnimatorProxy and AnimatorParameterSetter
- Fully expand both models, you will see some additional transforms in HeroKid
- Drag over the extra transforms into the same spaces in the skeleton
- FPSPosition in Head
- ShordSheathe, ShieldSheathe and OverheadItem in Chest
- HoldingLockOnPoint, … directly under HeroKid
- Delete the HeroKid model
- On the HeroPlayerCharacter set Animator to HeroSkeleton
- Set ItemParentRight/Left to the new Item.R/L transforms
- On CharacterControllerMovement set Pivot to HeroSkeleton
- In the LockableCameraFreeLook in Camera replace the Reference transform and set all the renderers from the skeleton to FirstPersonHideRenderers
If you now open up HeroDebuggingGeneral you should be able to move around and perform all the different actions with the new model.
Trigger
This object contains a CapsuleCollider trigger and a Rigidbody. These are used by a TriggerDamageReceiver for damage that affects the player and a GenericTriggerItem for general trigger areas like the exit trunks.
Actor
Contains actions the player can perform on its own and the actor that manages their execution. Other actions are located on items or environment objects.
The hero demo uses the MinimalCharacterActor so the character can only perform one action at a time and no further action can be queued until the current one is done.
- Jump is a basic MotionAction that propels the character when it is started
- Roll is also a MotionAction but it locks rotation movement while active
- The different Attack actions use VisualScriptingAction
open up the HeroAttackAction graph to explore how it works, the messages it receives are sent by animation events found in the HeroKid model - The JumpAttack uses a MotionAction
additional logic like damage activation is handled in a script machine executing HeroJumpAttack - Guard is a custom action made for the hero demo
it was made in code as it performs some bone rotations that would be a hassle in visual scripting, the Starting and Ending events are configured to send messages that are used in the AudioManager - Sheathe is a simple VisualScriptingAction that prompts the character to sheathe items it has in its hands, the sheathing itself is handled in the HeroPlayerCharacter
- Present is a TimelineAction that executes a timeline that shows off a newly gotten item
it gets started by the HeroPlayerCharacter which also instantiates the visual of the item - Die is another TimelineAction that is started from the HeroCharacter visual graph
- Climb is a custom action that lets the player climb up some special surfaces
double click the script to check it out in Visual Studio, like most classes in AAK it has an explanation at the top of the file, examples for climbable surfaces are found in HeroDebuggingClimbing or the HeroBeach and HeroInland scenes
Inventory
The Inventory uses a simple ListedInventory and contains no items in the prefab. Items can be added for debugging in all scenes except the beach scene. As this is the first scene that is loaded the inventory content there determines the players starting items. In any other scene there should already be save data that overrides the inventory content set in the scene.
Both Sword- and ShieldSlot are of type instantiatingItemSlot. The Shield- and SwordParent transforms they instantiate into are move to the characters hand or sheathing position by the HeroPlayerCharacter script.
The equipment slots use a fairly simple custom slot called HeroEquipmentSlot which instantiates the action prefab defined on the HeroEquipmentItem. The instance of that action is then checked to determine if the slot can be used. The three regular slots are used from the equipment buttons that are visualized in the top right, the fourth slot called EquipmentX is used when an item is used directly from the menu.
The inventory also defines some item capacities. These are raised when the player collects a CapacityRaisingItem like the Nut Bag or Money Pouch. There is no place to collect these in the regular game yet but they can be tested in HeroDebuggingGeneral
Status
This object contains a couple different components representing the characters status.
There is only a single resource value in the ResourcePool called health. It is decreased by HeroHealthDamage and increased by usable items like the HeroHeart. The HeroCharacter state machine initiates death when it runs out.
The Attribute Pool contains the HeroHearts attribute which is increased by collecting HeroHeartEssence usable items. The HeroHeartsMaximum stat copies that attribute and is used to determine the maximum health of the hero. This is configured in the ResourceMaximums field of the pool.
There is an Effect Pool even though there are currently no effects relevant to the player character. The currently only effect of the demo is called HeroStunEffect and is added to enemies when their HeroStun resource is filled by the HeroStunDamage done in HeroNutImpact. You can quickly try that out in the HeroDebuggingSkeleton scene.
LockOn
Contains a trigger collider and LockOnManager which is a special kind of TriggerArea. It receives inputs from events in the PlayerInput component on HeroCharacter. Enemies and anything else that needs locking on have to contain the counterpart LockOnPoint. There are some simple spheres with lock on points to quickly try this out in the HeroDebuggingGeneral scene.
The HeroTargetCandidate has a Follower component that is triggered by actions configured in the managers inspector. It visualizes possible lock on points while nothing is locked on. It also contains an animator that is controlled by events on the follower. Another Follower can be found on the LockOnTarget in the UI transform. This one is shown when a point is actually locked on.
There is a separate testing scene for the lock on system in AdventureCore.Tests called LockOnTest which can be used to test out the system in isolation.
Sound
The AudioManager here contains sound effects directly related to the player character. Its Key field is empty making it the main manager accessible anywhere. The manager responsible for music can be found directly under HeroSetup. Another one that plays UI selection beeps and button clicks is located in the UI transform.
All Messages received on the HeroPlayerCharacter are forwarded to it using the MessageReceived event. This includes messages sent by animations using the OnAnimation function. You can find these on the HeroKid model import. For example select HeroKidRoll and expand the event section to find STEP messages along with the START and END messages needed by the action. Some messages are also handled by items, for example the S_SWING message on the HeroKidAttackHA animation is handled by a CharacterMessenger directly on the HeroDebugSword prefab allowing different sounds per sword. Some messages are also sent by actions directly, jump and roll send a GRUNT message when they are started.
UI
This is the root transform for the 2d user interface of the hero demo which is made using Unity uGUI. As such it contains the typical Canvas and EventSystem components as well as the InputSystemUIInputModule which connects it to the new Unity input system. The only AAK component here is the EventSystemCursor which places the Cursor element over the current gameobject of the event system and scales it to fit.
SignDialog
Dialog used by the VisualScriptingAction in the HeroSign object. Has to be assigned in the variables of the script machine of the sign so it can display its text.
TextBox
The TextBoxTMP here is used to display newly acquired items as part of the Present TimelineAction. The one located in TextBoxFullscreen is used in the Die action.
Menu
Contains the pause menu with its gear, equipment and settings tabs. Showing the menu and tabbing between screens is handled by the HeroMenu script. It references the Fade transform which contains a solid black screen that is used to fade out the screen when the game is ended.
The top bar contains buttons that can jump directly to their tabs and buttons that switch to the right and left. Those are connected to the right and left triggers on controllers using a ButtonInputAdapter which is triggered by events on the PlayerInput component on HeroCharacter.
The actual contents of the tabs are located in the Contents transform. Feel free to activate any tab you are making changes to, any tab except the starting tab set in the CurrentTab field is automatically deactivated on start.
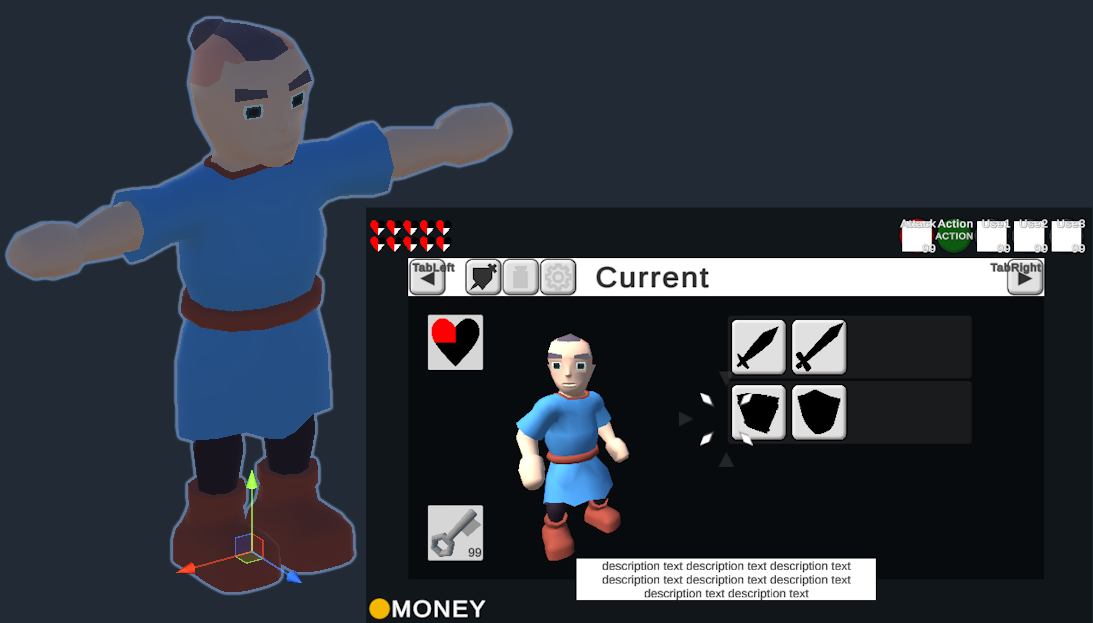
The Gear tab shows some general item info and lets players select their current gear.
- Character shows the fake character model located in Gear
- Items contains different buttons that use the HeroGearToggle script to equip and unequip gear items
- HeartShards visualizes how many HeroHeartShard items the player currently carries using a visual script machine, since the shard is a PlaceholderItem when the player collects their fourth shard a HeroHeartEssence is added instead and the shards are reset
- Keys uses a simple ItemQuantityVisualizer to visualize the current number of keys
In the Equipment tab players can assign equipment items to their equipment slots. The actual assignment and animation is handled by the respective HeroSlotPanel in the HUD. These check which HeroEquipmentButton is currently selected to know which item to assign. Alternatively equipment can be directly used from the menu by pressing the button.
The Settings tab contains AudioSlider components for changing different audio group volumes and a QualityDropdown which changes the visual fidelity to one of the quality settings defined in the project settings. It also has buttons for ending the game that trigger methods inside the HeroMenu.
HUD
The HUD shows the player health, money and available actions during gameplay. Different situations like cutscenes or dialogs require parts or the entirety of the HUD to be hidden. This is done using a StateManager that activates gameobjects and passes animator parameters according to the current state. Since its not possible in Unity to call methods with multiple parameters from events the manager uses an AnimatorParameterSetter to set the state parameter of the animator.
- Equipment1-3 use the HeroSlotPanel script to display the currently assigned item and for assignment of the slot from the equipment tab
- Money has a ItemQuantityTextCapped script which visualizes the quantity in a text field and changes its color when the item capacity is reached
- Health displays the current and maximum player health using one HeroHealthBar script which has references to a HeroHealthUnit for each possible heart.
Money and Health are both stored as prefabs so they can be reused to display money and health of the save slots in the intro screen.
Gear
This is where the player model that is shown in the gear screen is located. It uses its own camera and lighting which is separated from the regular game by using the UI layer. The contents of the sword and shield slots from the actual player character are copied using InstantiatingItemSlotClone scripts.